IoT漏洞挖掘思路
0x01 获取固件 #
一般从固件厂商官网获取
也可以通过抓设备升级的包、购买硬件设备来获取固件
0x02 解密固件 #
参考链接: 固件解密 - IOT 固件安全 All in One (gitbook.io)
- 在解密固件之前可以先上网查询有没有相关文章
- 也可以看一下同一品牌的其他固件是如何解密的
解密固件是分析加密固件所需迈过的第一道坎
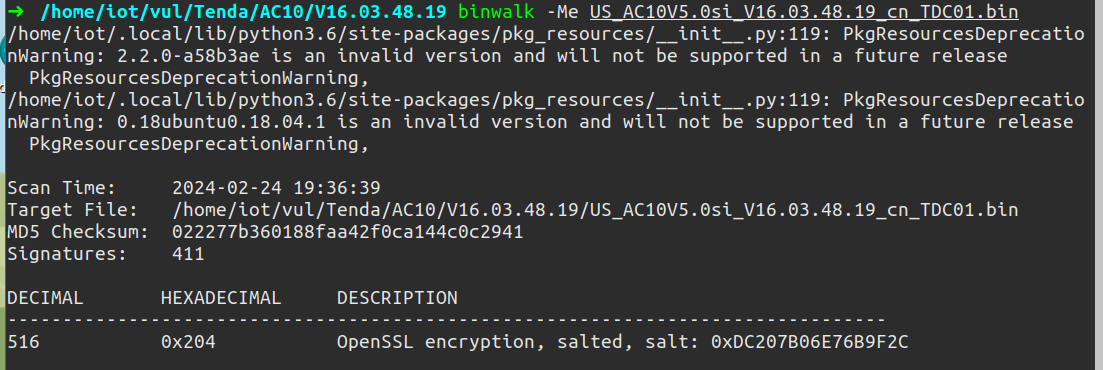
部分固件的解密思路可以参考以下思路:
看看是不是仍有少部分固件(或过渡版本的固件)并未加密,当这些固件升级的过程中大概也会使用到解密的程序,因此可以通过解开这些未加密固件,找到解密程序,并逆向分析出相关算法,这也是固件解密常用的一种手段。并且,一般一个厂商的固件加密算法都是相同的,这样所有的固件我们都能够解开了
解密完固件为后续的静态分析做准备
0x03 仿真模拟 #
动态分析方法需要固件进行仿真模拟,或者在物理设备上进行片上调试,来获得反馈信息
真实固件的调试可以参考: 固件调试 - IOT 固件安全 All in One (gitbook.io)
而仿真模拟可以参考以下的思路来进行:
- 先使用FirmAE、Firmware Analysis Toolkit等开箱即用的工具进行仿真
- 固件跑起来并不意味着成功仿真
- 可能会有部分功能的缺失
- 需要测试网络是否连通,web是否正常访问,若有其他开放端口是否能正常访问等
- 也可以使用FirmAFL、FirmFuzz、Fuzzware来进行仿真模拟+fuzz
- 工具仿真效果不理想时可以使用qemu来进行仿真
- Unicorn和Qiling暂时了解较少,也可以用来仿真模拟
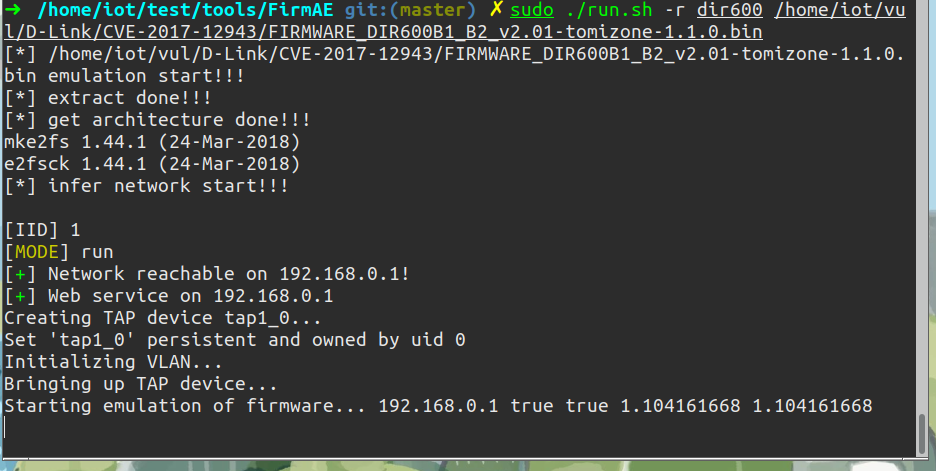
FirmAE #
- 成功概率较高(优于Firmadyne)
- FirmAE significantly increases the emulation success rate (From Firmadyne’s 16.28% to 79.36%)
- FirmAE及DlinkDIR320、600、645漏洞复现 - 『软件调试区』 - 吾爱破解 - LCG - LSG |安卓破解|病毒分析|www.52pojie.cn
- pr0v3rbs/FirmAE: Towards Large-Scale Emulation of IoT Firmware for Dynamic Analysis (github.com)
- Index of /pub/Router/DIR-645/Firmware (dlink.ru)
安装:
git clone --recursive https://github.com/pr0v3rbs/FirmAE
./download.sh
./install.sh
使用:
执行脚本
./init.sh
准备固件
# 举例:
wget https://github.com/pr0v3rbs/FirmAE/releases/download/v1.0/DIR-868L_fw_revB_2-05b02_eu_multi_20161117.zip
检查仿真
sudo ./run.sh -c <brand> <firmware>
分析目标固件
- 分析模式使用 FirmAE 分析器
sudo ./run.sh -a <brand> <firmware>
- 运行模式有助于测试 Web 服务或执行自定义分析器
sudo ./run.sh -r <brand> <firmware>
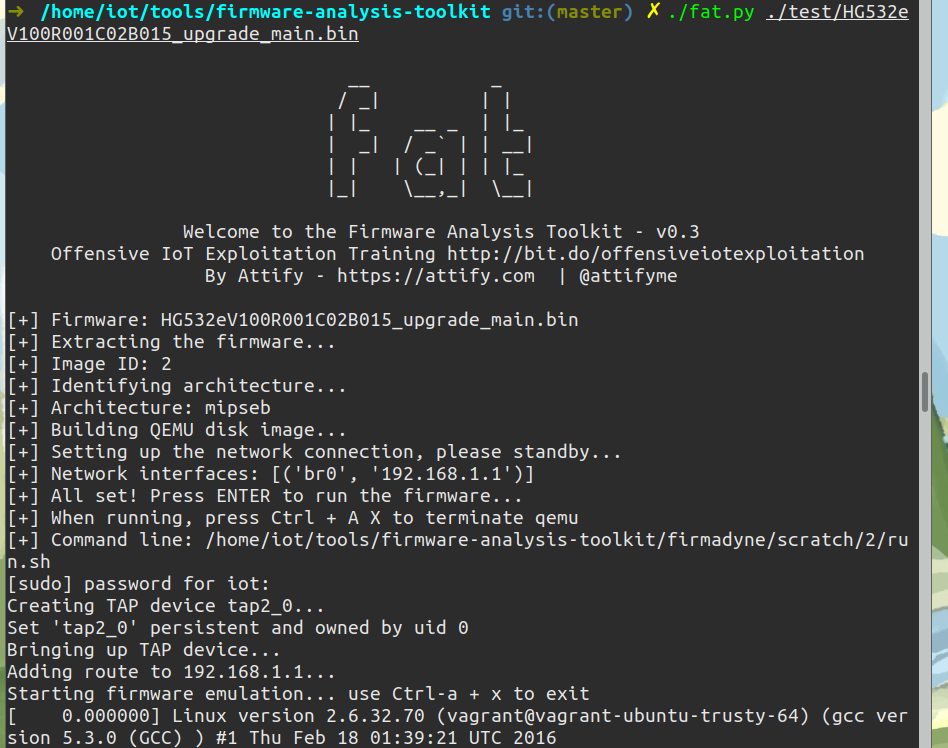
Firmware Analysis Toolkit #
安装:
git clone https://github.com/attify/firmware-analysis-toolkit
cd firmware-analysis-toolkit
./setup.sh
# fat.config
[DEFAULT]
sudo_password=attify123
firmadyne_path=/home/attify/firmadyne
使用:
./fat.py <firmware file>
$ ./fat.py DIR-601_REVB_FIRMWARE_2.01.BIN

                               __           _
                              / _|         | |
                             | |_    __ _  | |_
                             |  _|  / _` | | __|
                             | |   | (_| | | |_
                             |_|    \__,_|  \__|

                Welcome to the Firmware Analysis Toolkit - v0.3
    Offensive IoT Exploitation Training http://bit.do/offensiveiotexploitation
                  By Attify - https://attify.com  | @attifyme

[+] Firmware: DIR-601_REVB_FIRMWARE_2.01.BIN
[+] Extracting the firmware...
[+] Image ID: 1
[+] Identifying architecture...
[+] Architecture: mipseb
[+] Building QEMU disk image...
[+] Setting up the network connection, please standby...
[+] Network interfaces: [('br0', '192.168.0.1')]
[+] All set! Press ENTER to run the firmware...
[+] When running, press Ctrl + A X to terminate qemu
QEMU #
https://wokough.gitbook.io/iot-firmware-aio/wiki/fang-zhen-fen-xi#id-1.1-qemu
具体问题具体分析
具体固件使用对应的命令进行仿真
- 先上网搜索相关信息,看看有没有文章已经仿真过了
- 参考之前仿真设备的案例来试着仿真
- 如果都没有就需要我们参考着官方文档以及对固件的静态分析来自己调整命令
- 如果遇到一些参数实在没有办法满足时可以先跑起来
- 在动态调试的过程看是哪个汇编执行报错
- 再在IDA中进行合适的patch来使得固件可以成功仿真
例如当我们需要向main函数传递参数argv和设置环境变量时,可以先看看官方usage:
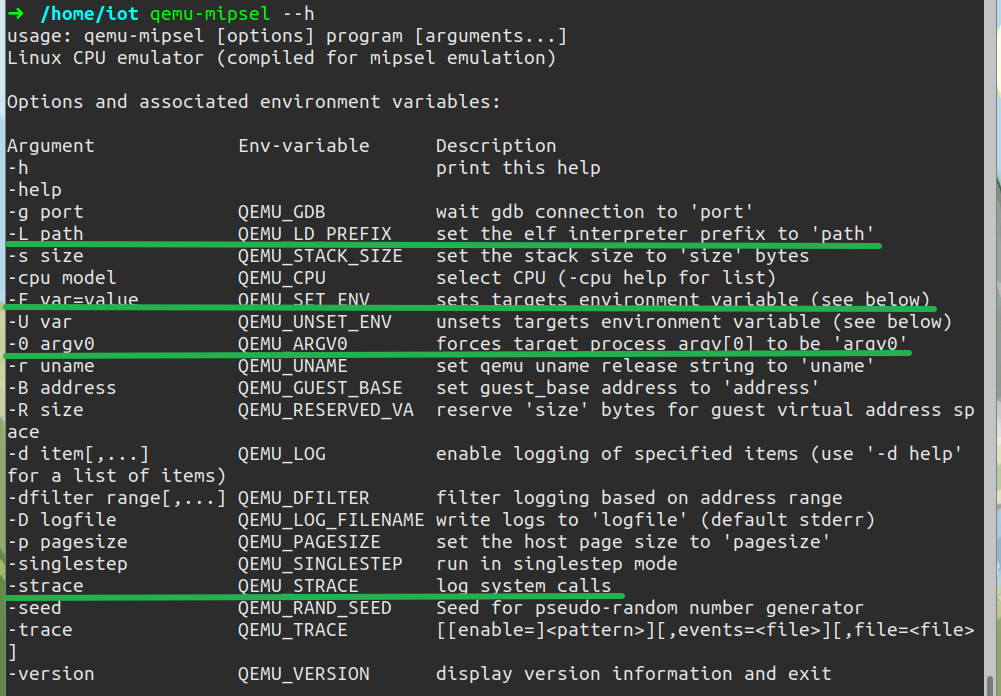
发现我们可以用-0选项传递第一个参数,用-E选项设置环境变量,用-L选项做到类似于更改根目录的效果,用-strace选项追踪程序执行时进程系统调用和所接收的信号,方便调试
-
部分固件的仿真需要我们使用qemu来配置网络
-
可以先拍一个快照再来开始仿真,便于会快照重新配置
-
参考 IoT-vulhub项目网络配置的方法,可以得到一个配置网络的shell文件模版
-
#!/bin/bash

# 启动 ssh 服务
/etc/init.d/ssh start

# 配置网卡
tunctl -t tap0
ifconfig tap0 192.168.2.1/24

# 启动 http 服务
nohup python3 -m http.server 8000 1>&/dev/null &

# 进入 qemu 镜像目录
cd /root/images

/usr/bin/expect<<EOF
set timeout 10000

# 依照固件及qemu文档更改此处命令
spawn qemu-system-mips -M malta -kernel vmlinux-3.2.0-4-4kc-malta -hda debian_wheezy_mips_standard.qcow2 -append "root=/dev/sda1 console=tty0" -netdev tap,id=tapnet,ifname=tap0,script=no -device rtl8139,netdev=tapnet -nographic

expect "debian-mips login:"
send "root\r"
expect "Password:"
send "root\r"

expect "root@debian-mips:~# "
send "ifconfig eth0 192.168.2.2/24\r"

#expect "root@debian-mips:~# "
#send "echo 0 > /proc/sys/kernel/randomize_va_space\r"

expect "root@debian-mips:~# "
send "scp root@192.168.2.1:/root/squashfs-root.tar.gz /root/squashfs-root.tar.gz\r"
expect {
    "(yes/no)? " { send "yes\r"; exp_continue }
    "password: " { send "root\r" }
}

expect "root@debian-mips:~# "
send "tar xzf squashfs-root.tar.gz && rm squashfs-root.tar.gz\r"
expect "root@debian-mips:~# "
send "mount -o bind /dev ./squashfs-root/dev && mount -t proc /proc ./squashfs-root/proc\r"

expect "root@debian-mips:~# "
send "scp -r root@192.168.2.1:/root/tools /root/squashfs-root/tools\r"
expect {
    "(yes/no)? " { send "yes\r"; exp_continue }
    "password: " { send "root\r" }
}

expect "root@debian-mips:~# "
send "echo 'sleep 30' > net.sh\r"
expect "root@debian-mips:~# "
send "echo 'ifconfig eth0 192.168.2.2/24' >> net.sh\r"
expect "root@debian-mips:~# "
send "echo 'ifconfig br0 192.168.2.3/24' >> net.sh\r"
expect "root@debian-mips:~# "
send "chmod +x net.sh && /bin/sh net.sh &\r"

expect "root@debian-mips:~# "
send "chroot squashfs-root/ sh\r"
expect "# "
send "./bin/upnp\r"
expect "# "
send "./bin/mic\r"

expect eof
EOF
-
0x04 fuzz #
动态分析查找漏洞时主要通过各类fuzz工具来得到漏洞的触发点
- 主要使用FirmAFL、FirmFuzz、Fuzzware工具来进行fuzz
- 也可以使用afl与afl++
Fuzzware #
fuzzware-fuzzer/fuzzware: Fuzzware’s main repository. Start here to install. (github.com)
git clone https://github.com/fuzzware-fuzzer/fuzzware.git

sudo ./build_docker.sh

sudo ./run_docker.sh examples fuzzware pipeline --skip-afl-cpufreq pw-recovery/ARCH_PRO
sudo ./run_docker.sh test fuzzware pipeline --skip-afl-cpufreq .
成功将固件跑起来:
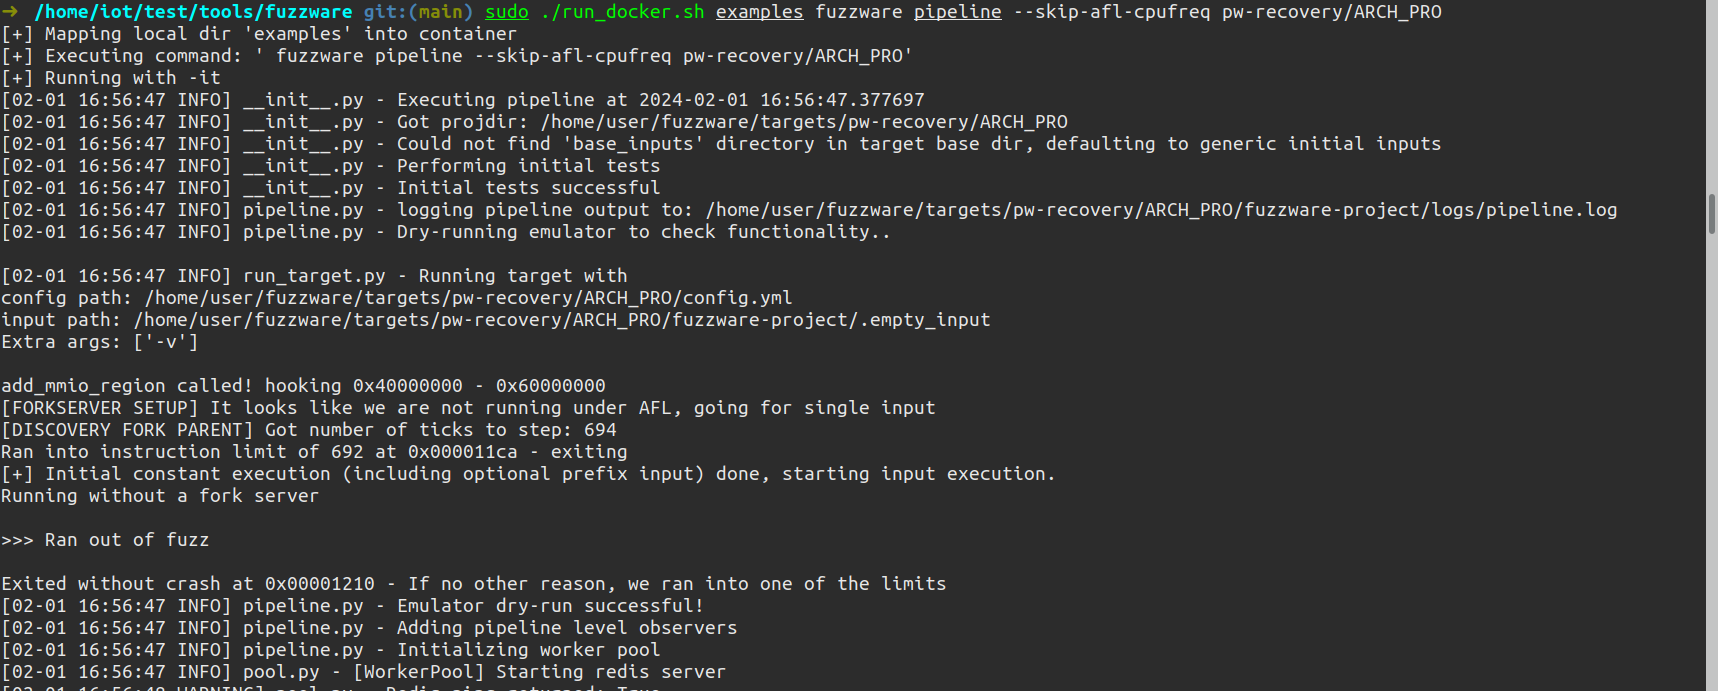
由图可以看到刚开始运行时发现新的MMIO寄存器模型,由于MMIO Access Model中并不存在,因此会将其定义为新的模型,然后继续向下运行
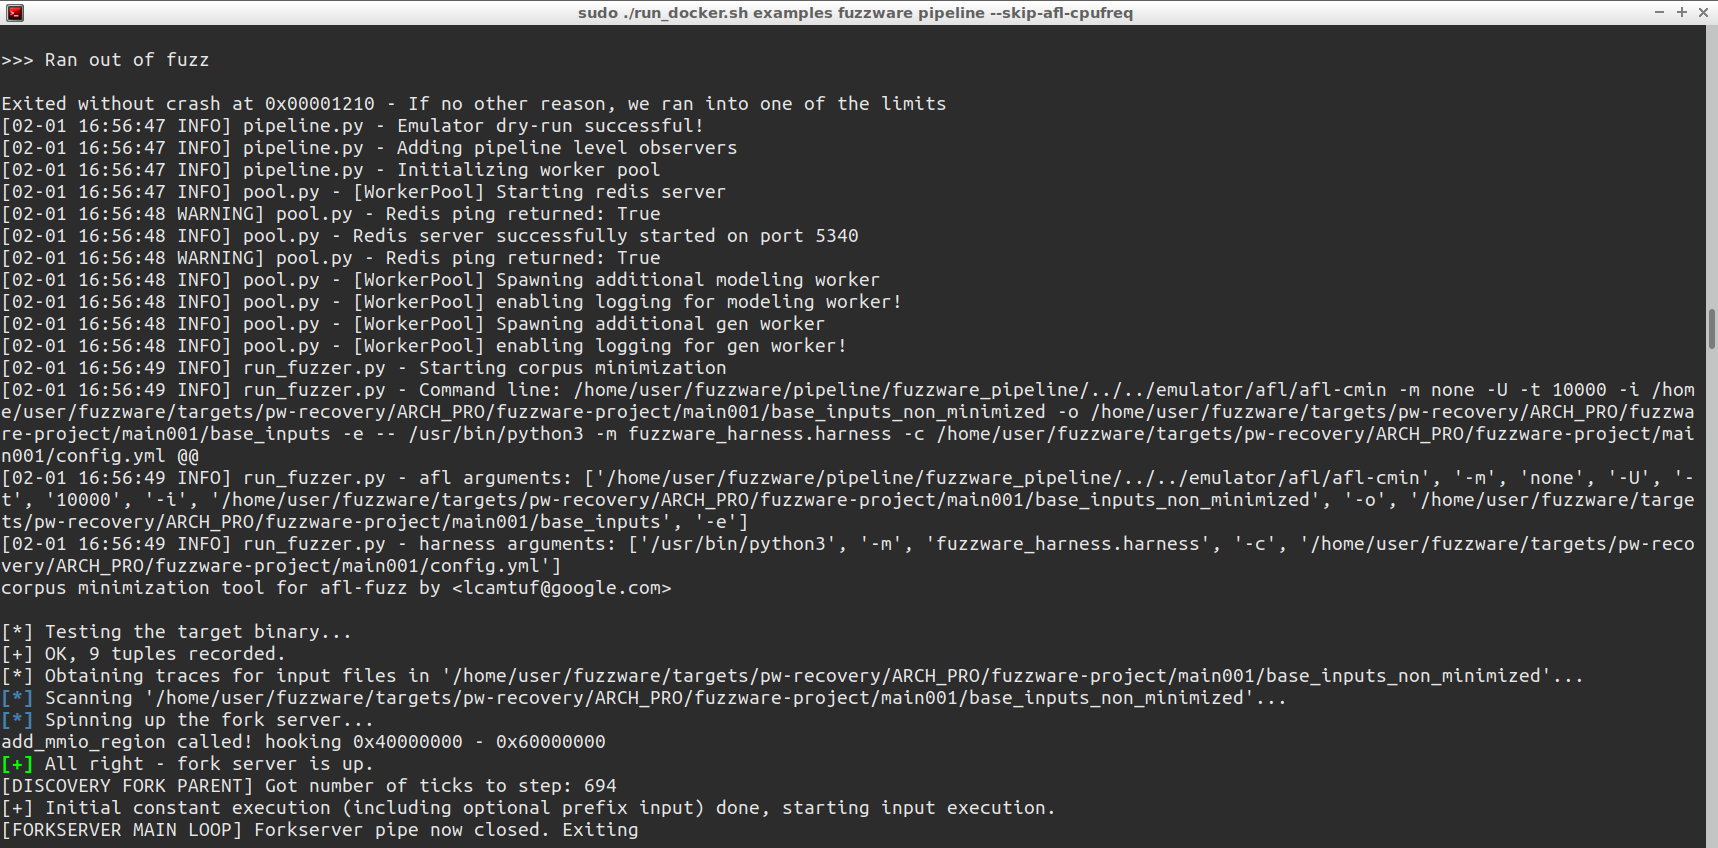
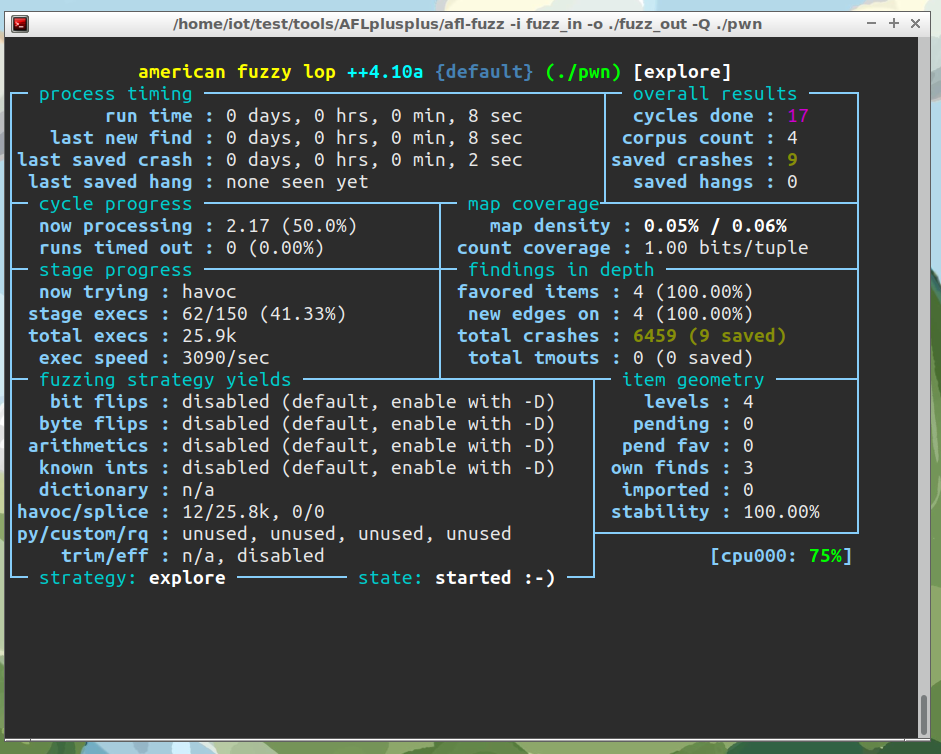
建模完毕后,开始进行正常的fuzzing阶段:
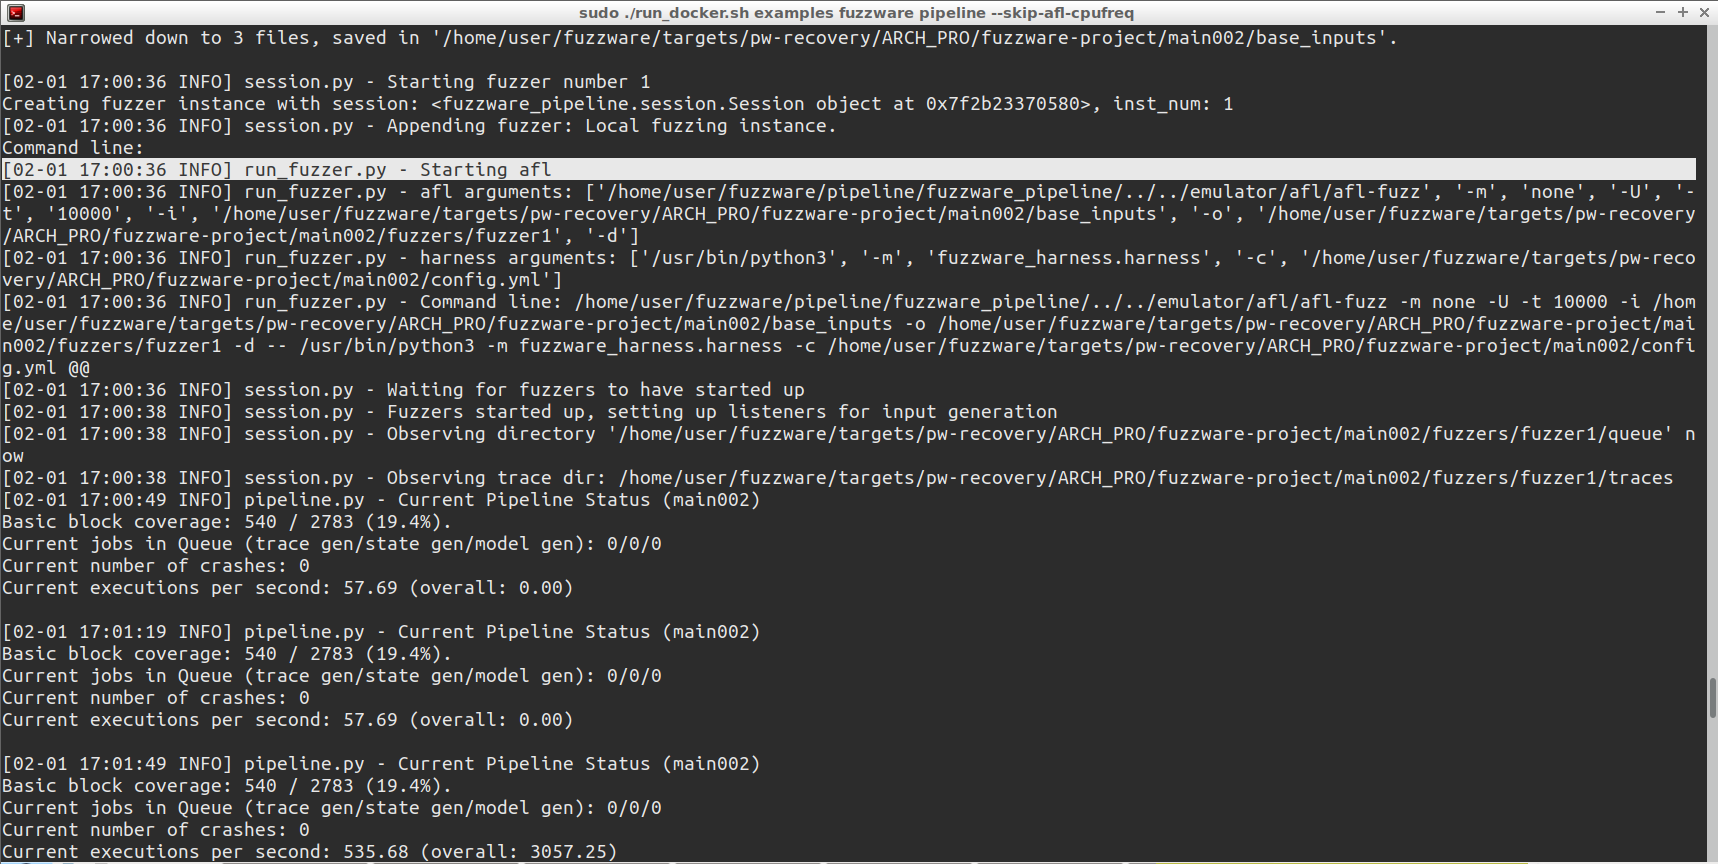
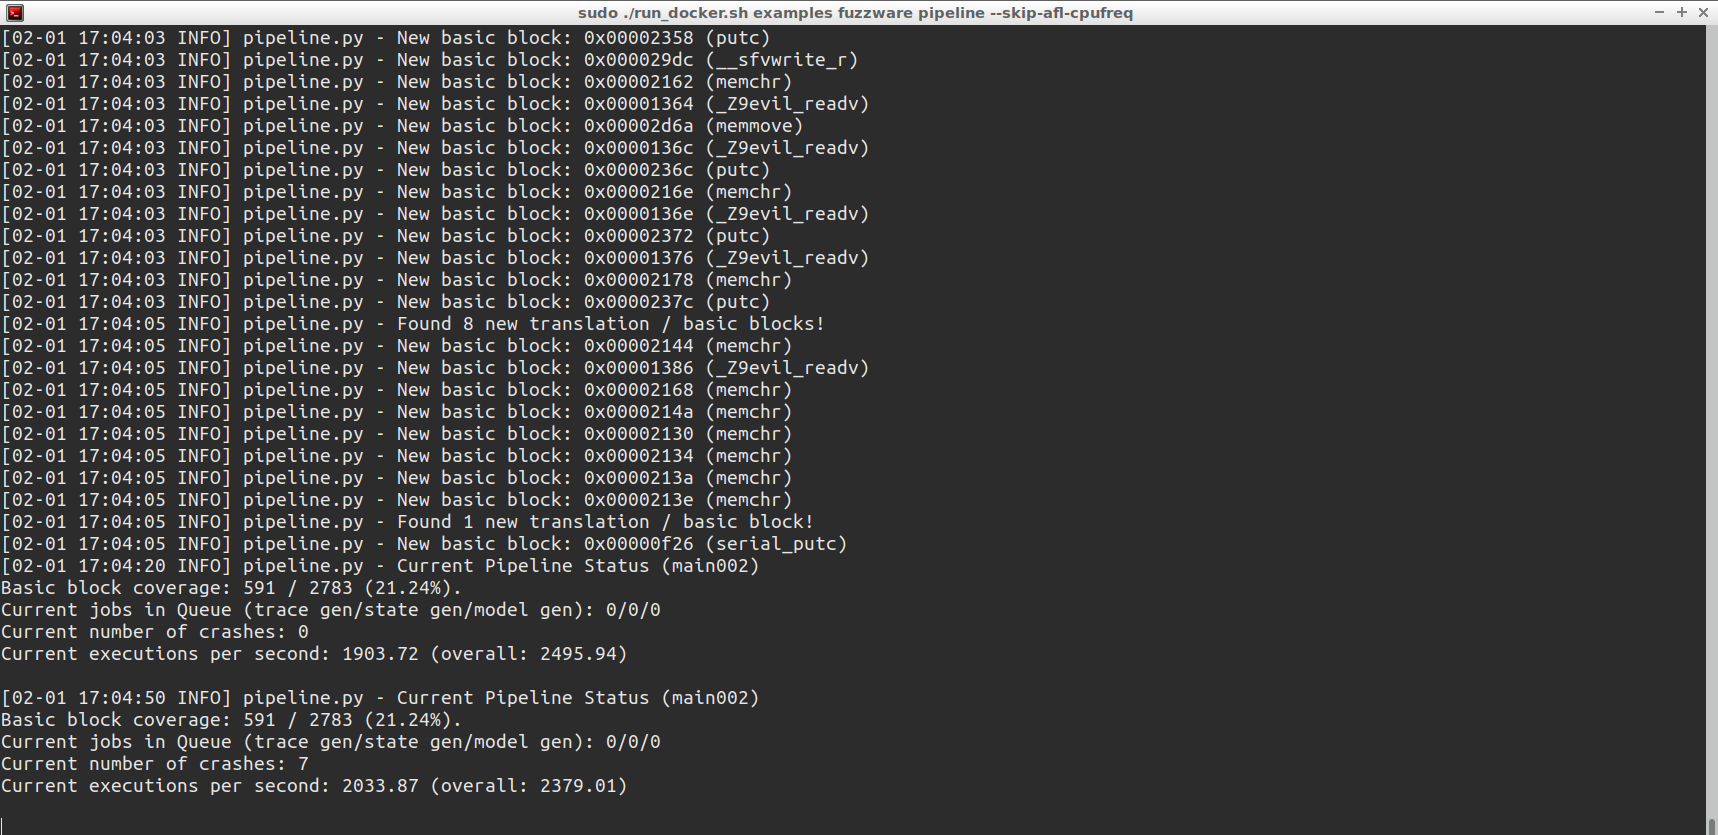
每一轮fuzzing结束后,根据反馈调整输入,开始下一阶段fuzzing:
afl++ #
有源码 #
使用 afl-gcc 进行插桩编译:
afl-gcc test.c -o test_file
gcc test.c -o test_gcc
- afl-gcc 插桩编译后,fuzz 的速度会快一些
接下来就可以进行 fuzz 了:
afl-fuzz -i ./fuzz_in -o ./fuzz_out ./test_file -f
- fuzz_in 为语料库,可以直接使用 AFL 自带的 testcases
- fuzz_out 就是输出的内容
无源码 #
配置:
sudo apt-get install libtool-bin libgtk2.0-dev -y
cd /home/iot/test/tools/AFLplusplus/qemu_mode
./build_qemu_support.sh
cd ..
sudo make install
afl-fuzz -Q -m none -i in -o out ./pwn_file @@

/home/iot/test/tools/AFLplusplus/afl-fuzz -i fuzz_in -o ./fuzz_out -Q ./pwn
0x05 静态分析 #
浅析IOT二进制静态辅助方法 - FreeBuf网络安全行业门户
-
IDA
- 大多数是32位的,少数是64位的
- 推荐安装keypatch插件,在patch固件的时候会方便一些
-
Ghira
- 可以安装许多有用的插件
-
SaTC
- 自动化挖掘工具
-
其他二进制静态辅助工具
- BinAbsInspector
- Rhabdomancer
- Haruspex + semgrep
SaTC #
安装
建议通过使用Dockerfile来构建系统环境:
# 进入SaTC代码目录
cd SaTC

# 构建Docker镜像
docker build . -t satc

# 进入Dokcer环境, 自行添加目录映射
docker run -it satc
如果因为网络等原因无法构建,可使用我们提供等docker image
# 从docker hun拉去image
docker pull smile0304/satc:V1.0

# 进入Dokcer环境, 自行添加目录映射
docker run -it smile0304/satc:V1.0
使用方法
usage: satc.py [-h] -d /root/path/_ac18.extracted -o /root/output
               [--ghidra_script {ref2sink_cmdi,ref2sink_bof,share2sink,ref2share,all}]
               [--save_ghidra_project] --taint_check
               [-b /var/ac18/bin/httpd | -l 3]

SATC tool

optional arguments:
  -h, --help            查看帮助
  -d /root/path/_ac18.extracted, --directory /root/path/_ac18.extracted
                        指定从固件中提取出的文件系统
  -o /root/output, --output /root/output
                        指定结果输出位置
  --ghidra_script {ref2sink_cmdi,ref2sink_bof,share2sink,ref2share,all}
                        (可选) 指定要使用的 Ghidra 脚本。 如果使用`all`命令,`ref2sink_cmdi`、`ref2sink_bof`和`ref2share`三个脚本将同时运行
  --ref2share_result /root/path/ref2share_result  (可选) 运行`share2sink` Ghidra脚本时,需要使用该参数指定`ref2share`脚本的输出结果
  --save_ghidra_project (可选) 是否保存程序运行时产生的ghidra工程路径
  --taint_check         (可选) 指定是否启用污点分析
  -b /var/ac18/bin/httpd, --bin /var/ac18/bin/httpd
                        (可选) 用于指定需要分析的程序,如果不指定,SaTC将使用内置算法确认需要分析的程序
  -l 3, --len 3         (可选) 根据分析结果分析可能为边界的前N个程序,默认为3
输出结果的目录结构为:
|-- ghidra_extract_result # ghidra寻找函数调用路径的分析结果, 启用`--ghidra_script`选项会输出该目录
| |-- httpd # 每个被分析的bin都会生成一个同名文件夹
| |-- httpd # 被分析的bin
| |-- httpd_ref2sink_bof.result # 定位bof类型的sink函数路径
| |-- httpd_ref2sink_cmdi.result # 定位cmdi类型的sink函数路径
|-- keyword_extract_result # 关键字提取结果
| |-- detail # 前端关键字提取结果(详细分析结果)
| | |-- API_detail.result # 提取的API详细结果
| | |-- API_remove_detail.result # 被过滤掉的API信息
| | |-- api_split.result # 模糊匹配的API结果
| | |-- Clustering_result_v2.result # 详细分析结果(不关心其他过程关心此文件即可)
| | |-- File_detail.result # 记录了从单独文件中提取的关键字
| | |-- from_bin_add_para.result # 在二进制匹配过程中新增的关键字
| | |-- from_bin_add_para.result_v2 # 同上,V2版本
| | |-- Not_Analysise_JS_File.result # 未被分析的JS文件
| | |-- Prar_detail.result # 提取的Prar详细结果
| | |-- Prar_remove_detail.result # 被过滤掉的Prar结果
| |-- info.txt # 记录前端关键字提取时间等信息
| |-- simple # 前端关键字提取结果, 比较简单
| |-- API_simple.result # 在全部二进制中出现的全部API名称
| |-- Prar_simple.result # 在全部二进制中出现等的全部Prar
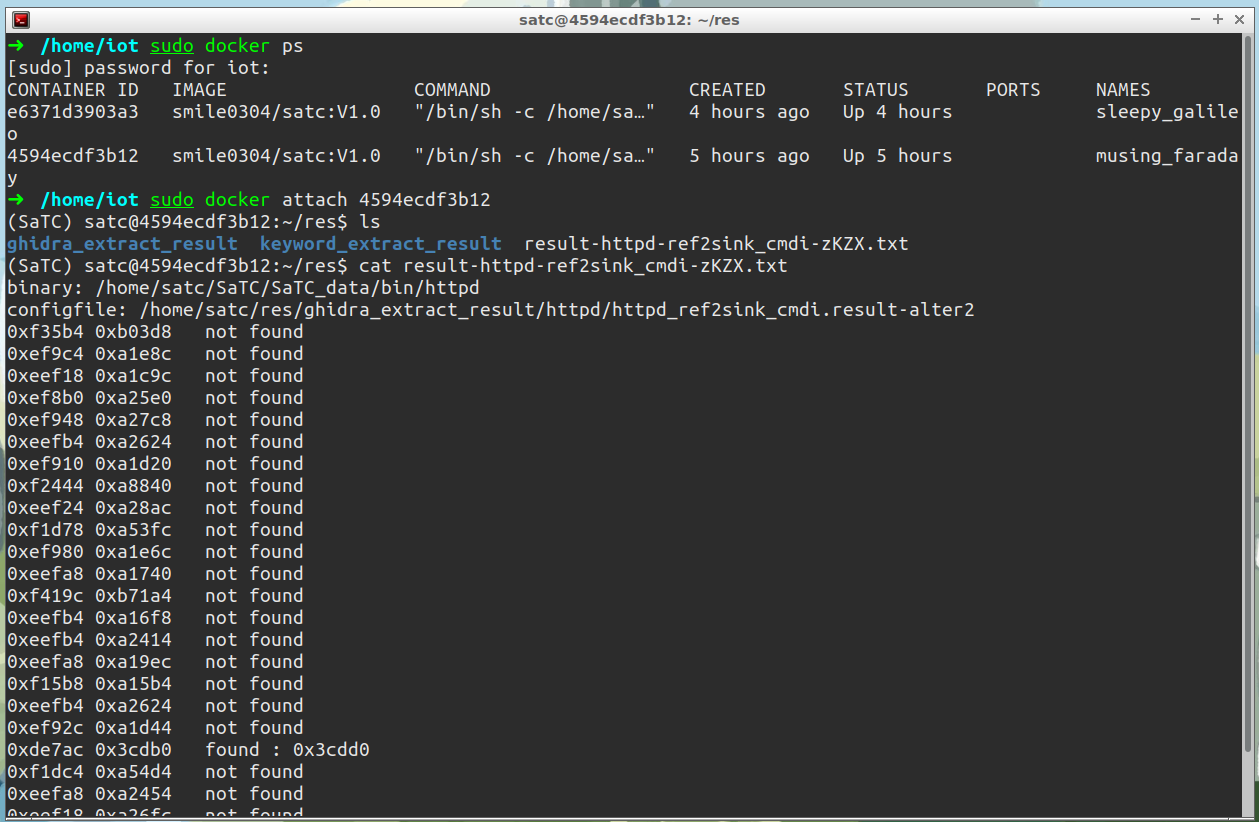
|-- result-httpd-ref2sink_cmdi-ctW8.txt # 污点分析结果,启用`--taint-check` 和 `--ghidra_script`选项才会生成该文件
在/home/satc/res下生成的txt文件可以查看结果
0x06 验证漏洞 #
- 直接购买真实设备来验证漏洞
- 本地仿真模拟来验证 or 复现
- 可以先按照 0x03 部分先对固件进行仿真模拟
- 然后在本地对漏洞进行验证或复现
- 一些路由器固件的漏洞可以在一些网站上查找到还在用此路由器设备的站点
0x07 其他 #
-
挖漏洞之前可以先在各类cve cnvd平台搜索一下
-
相关产品的漏洞可以提供参考
-
也可以避免重复挖出/提交已有的漏洞
-
-
挖出一个洞之后
- 可以横向看看同一家厂商的其他产品是不是也存在类似的漏洞
- 可以思考这个漏洞点是否有其他更加有危害的利用方式
-
还可以思考一下如何修复这个漏洞
- 应该如何打补丁
- 一些有漏洞的固件在第一次修补之后仍存在漏洞,我们的修复方式是否能避免这样的情况
-
可以参考一下winmt师傅的挖洞经历
后记 #
漏洞挖掘众多尝试的一小部分:
- 尝试1
$ wget https://down.tenda.com.cn/uploadfile/AC18/ac18_kf_V15.03.05.19(6318_)_cn.zip
$ binwalk -Me ac18_kf_V15.03.05.19(6318_)_cn.zip
$ sudo docker run -it -v ./squashfs-root/:/home/satc/SaTC/SaTC_data smile0304/satc
# 进入SaTC容器中
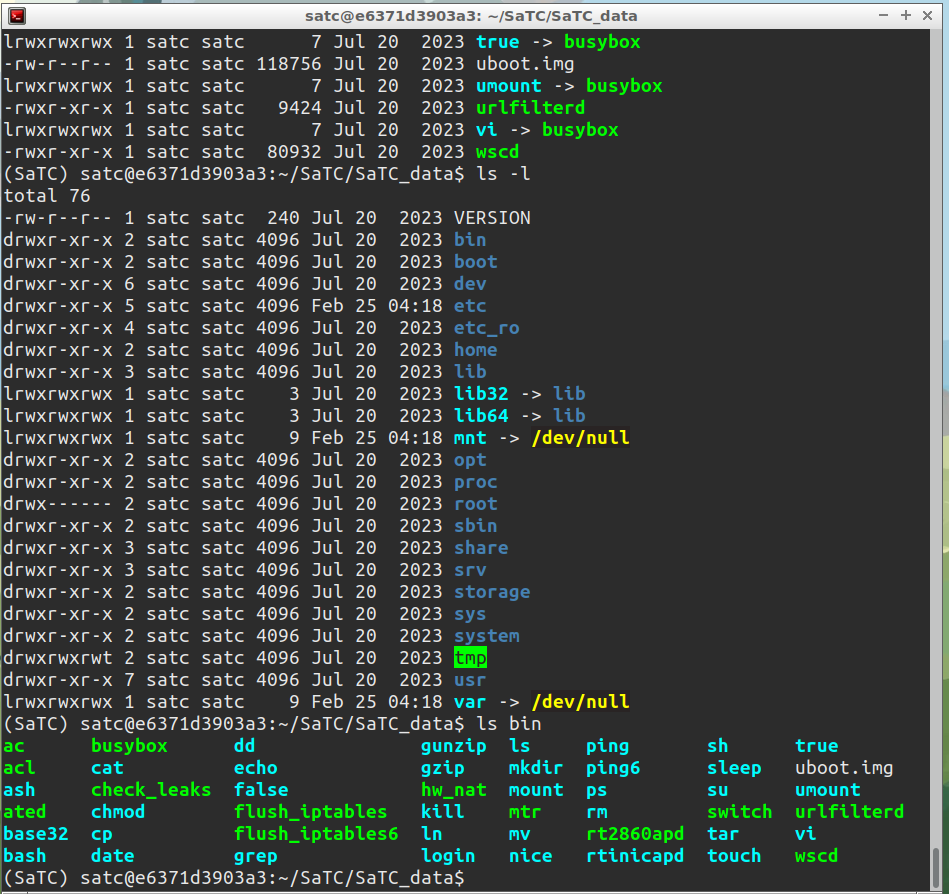
# 检查/home/satc/SaTC/SaTC_data文件夹中是否有数据
$ ls /home/satc/SaTC/SaTC_data
$ cd ~/SaTC
# 测试/bin/httpd是否存在命令注入漏洞
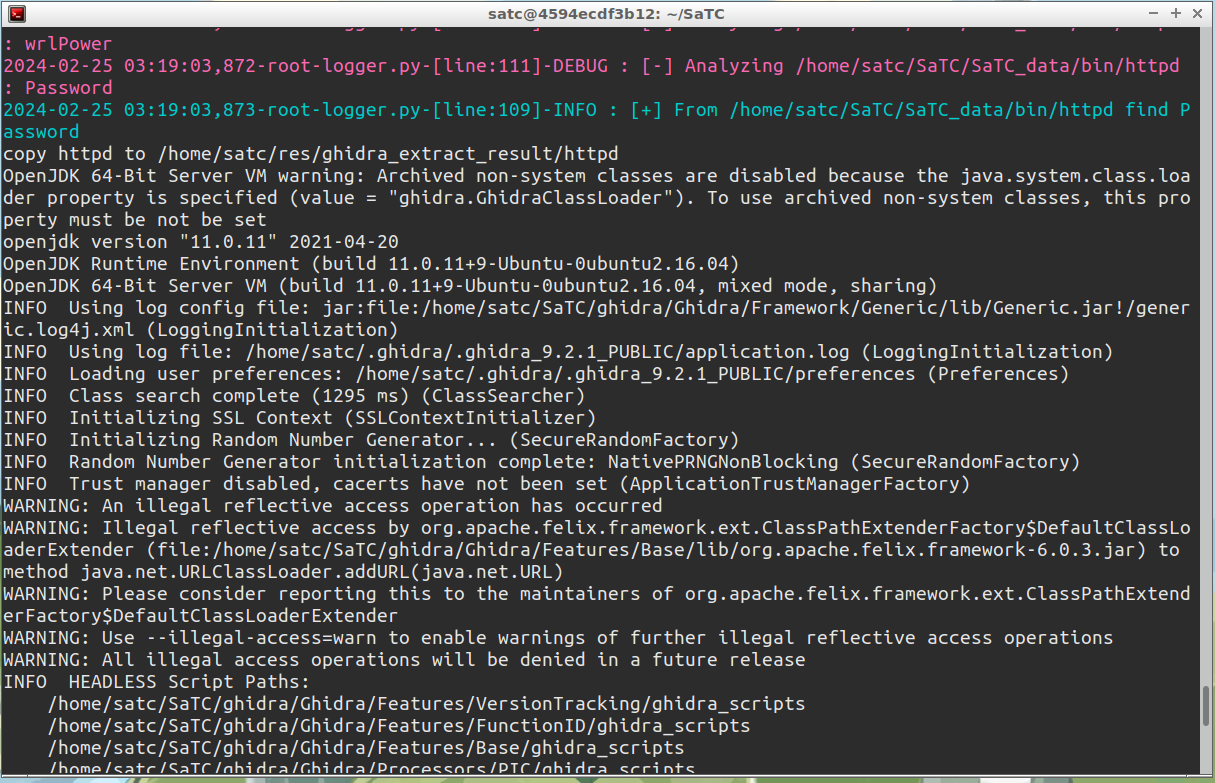
$ python satc.py -d /home/satc/SaTC/SaTC_data -o /home/satc/res --ghidra_script=ref2sink_cmdi -b httpd --taint_check
# 测试/bin/httpd是否存在缓冲区溢出漏洞
$ python satc.py -d /home/satc/SaTC/SaTC_data -o /home/satc/res --ghidra_script=ref2sink_bof -b httpd --taint_check
过程中可能会飘红,或者警告,直接忽略,只要在/home/satc/res下输出txt文件就ok
- 尝试2
$ wget https://down.tenda.com.cn/uploadfile/AC10/V16.03.48.23.zip
$ unzip V16.03.48.23.zip && cd V16.03.48.23
$ binwalk -Me US_AC10V5.0si_V16.03.48.23_cn_TDC01.bin
- 尝试3
$wget https://ftp.dlink.ru/pub/Router/DWR-921/Firmware/2023.07.20-15.22_DWR_921_POST_4.0.2_release.bin
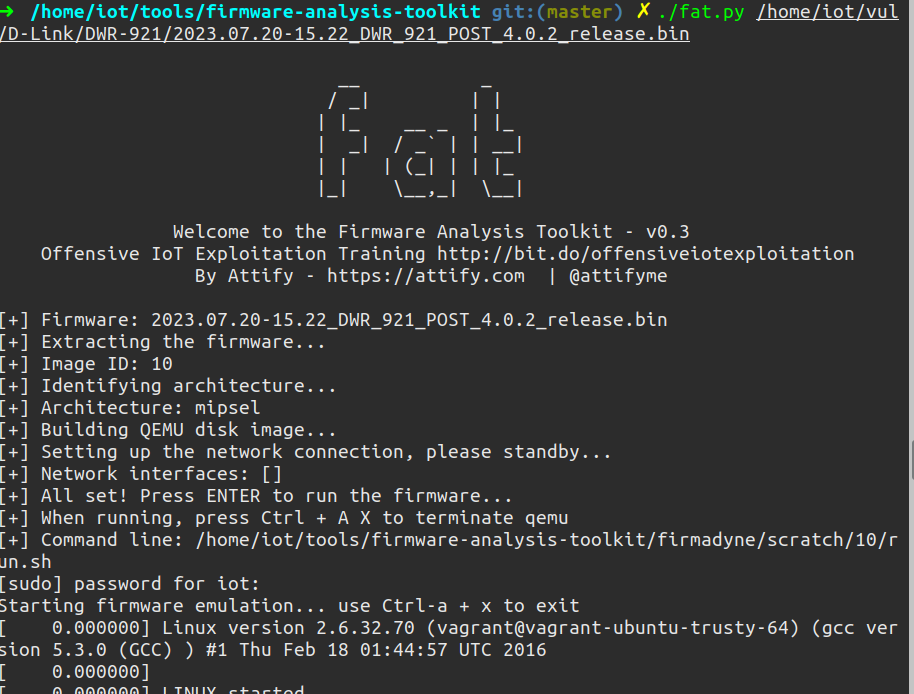
$ cd /home/iot/tools/firmware-analysis-toolkit
$ ./fat.py /home/iot/vul/D-Link/DWR-921/2023.07.20-15.22_DWR_921_POST_4.0.2_release.bin
$ binwalk -Me 2023.07.20-15.22_DWR_921_POST_4.0.2_release.bin
$ sudo docker run -it -v ./squashfs-root/:/home/satc/SaTC/SaTC_data smile0304/satc

# 进入SaTC容器中
# 检查/home/satc/SaTC/SaTC_data文件夹中是否有数据
$ ls /home/satc/SaTC/SaTC_data
$ cd ~/SaTC
# 测试/bin/httpd是否存在命令注入漏洞
$ python satc.py -d /home/satc/SaTC/SaTC_data -o /home/satc/res --ghidra_script=ref2sink_cmdi -b httpd --taint_check
# 测试/bin/httpd是否存在缓冲区溢出漏洞
$ python satc.py -d /home/satc/SaTC/SaTC_data -o /home/satc/res --ghidra_script=ref2sink_bof -b httpd --taint_check
文章后面的部分还在施工中,
路过的师傅们看看远处的学习记录吧!
文章的部分内容被密码保护:
- 尝试10086…